Showing posts with label auds' patterns. Show all posts

Friday, July 15, 2011

jeans to skirt

This project has been a long time coming.

I bought these jeans at a thrift shop because if you find jeans with a 30" waist and a 36" inseam, you just don't pass them up.

Unfortunately, even after paying only $6 for the jeans, I never wore them because the seam from waist to crotch was too long.  I felt like I was wearing men's pants; they sagged and bunched under my crotch and I just didn't feel sexy in them!

So, I decided to make them into a knee-length jean skirt--something which I've never been able to find for myself because my legs are so long.  I used the bottom of the jeans that I cut off to fill the triangle-shaped gaps created by cutting the legs apart.  I'm so happy with the results!

Before:

After:

Thursday, June 16, 2011

free father's day gift

Last year, I wanted to play around in Window's Movie Maker to make my husband a cute little video as an "extra" Father's Day gift.  The video turned out to be his favorite Father's Day gift, ever.

Because he loved it so much, I've made him another one this year, which turned out equally as sweet.  I thought I would share with you how I did it, if you would like to make one of your own.  (I'm not going to get very technical, but Movie Maker is fairly easy to use, and I would be more than happy to answer any questions e-mailed to me--if I know the answer, that is.) 

At the end of the post, I've included last year's video as an example.  {Please excuse the horrible video quality!}

The first thing I did was to come up with a list of questions to ask our kids.  Include things like, "What is Daddy's name?  Age?  Where does he work?  His favorite color?  Occupation?"  Older children could be asked to share a favorite story, or quality about dad.

I asked all the kids the same questions, including the kiddos that can't talk yet and recorded their answers responses.  Smiles, cooing, or even a sleeping baby are still sweet to watch, even if they can't answer vocally.

**Tip:  When recording the interviews, try to leave a few seconds buffer before and after their responses so that it is easier to edit down to just them talking.**

After recording all your interviews, use Movie Maker to "split" your videos into clips with just their responses to each question.  I then organized mine so that a question was posed, and then each child's response plays, and then the next question, and so on.

Because no one likes to hear themselves talk, I used title pages to ask the questions in the final product. 

At the end of the interviews, compile a series of photos of Dad just being him.  Both videos I've done, I've used pictures only from the past year, but you could use pictures from the first baby's pregnancy and forward, if you want a more comprehensive video.

While the photos are playing, it's nice to have something to listen to, so pick a song that means something to Dad and add that to the video.  Last year I chose 1,2,3,4 by Plain White T's.  Once the song is in the video, spend some time lengthening or shortening the amount of time each photo is displayed so that the song and the pictures end at the same time.

After the interviews and the photos, I like to put a final message using title page(s) and the end credits.

Finally, feel free to play around with the transitions and slide effects.  You can make your photos ripple, pan across them, etc.  When you have the video the way you want it, save it in a file that Dad won't look at until Father's Day, and wait to surprise him!

**One final tip:  Save, and save often!  These videos can be a lot of work, so you don't want to lose any of that time**

Here is the video I made last year.  I'm going truly embarrass my husband and report that he cried real tears while watching this.  Then, I posted it on our family blog, and my mom cried real tears too.  My kids sure do love their "Papi," and the seven years he has been such have been very rewarding.  It's nice to be able to look back at all the times we've had together.


For a free gift, it doesn't get any better!

Linked to:


A Little Knick Knack

Monday, June 6, 2011

make-your-own-costume kid craft

Today is trouble-maker #2's birthday.  He's 6, and he decided he wanted to have a costume party.

So we sent out the invites:
When each kid got there, besides the traditional party games, present opening, and cake & ice cream, we had a craft set up (the brain work behind which was mostly my husband's.)

We told each of the kids they could use whatever they wanted from the table to make themselves a *new* costume, and at the end of the time limit, Xavier, the birthday boy, picked the winner.  (He, of course, went the political route and declared them all the winners.)  :)


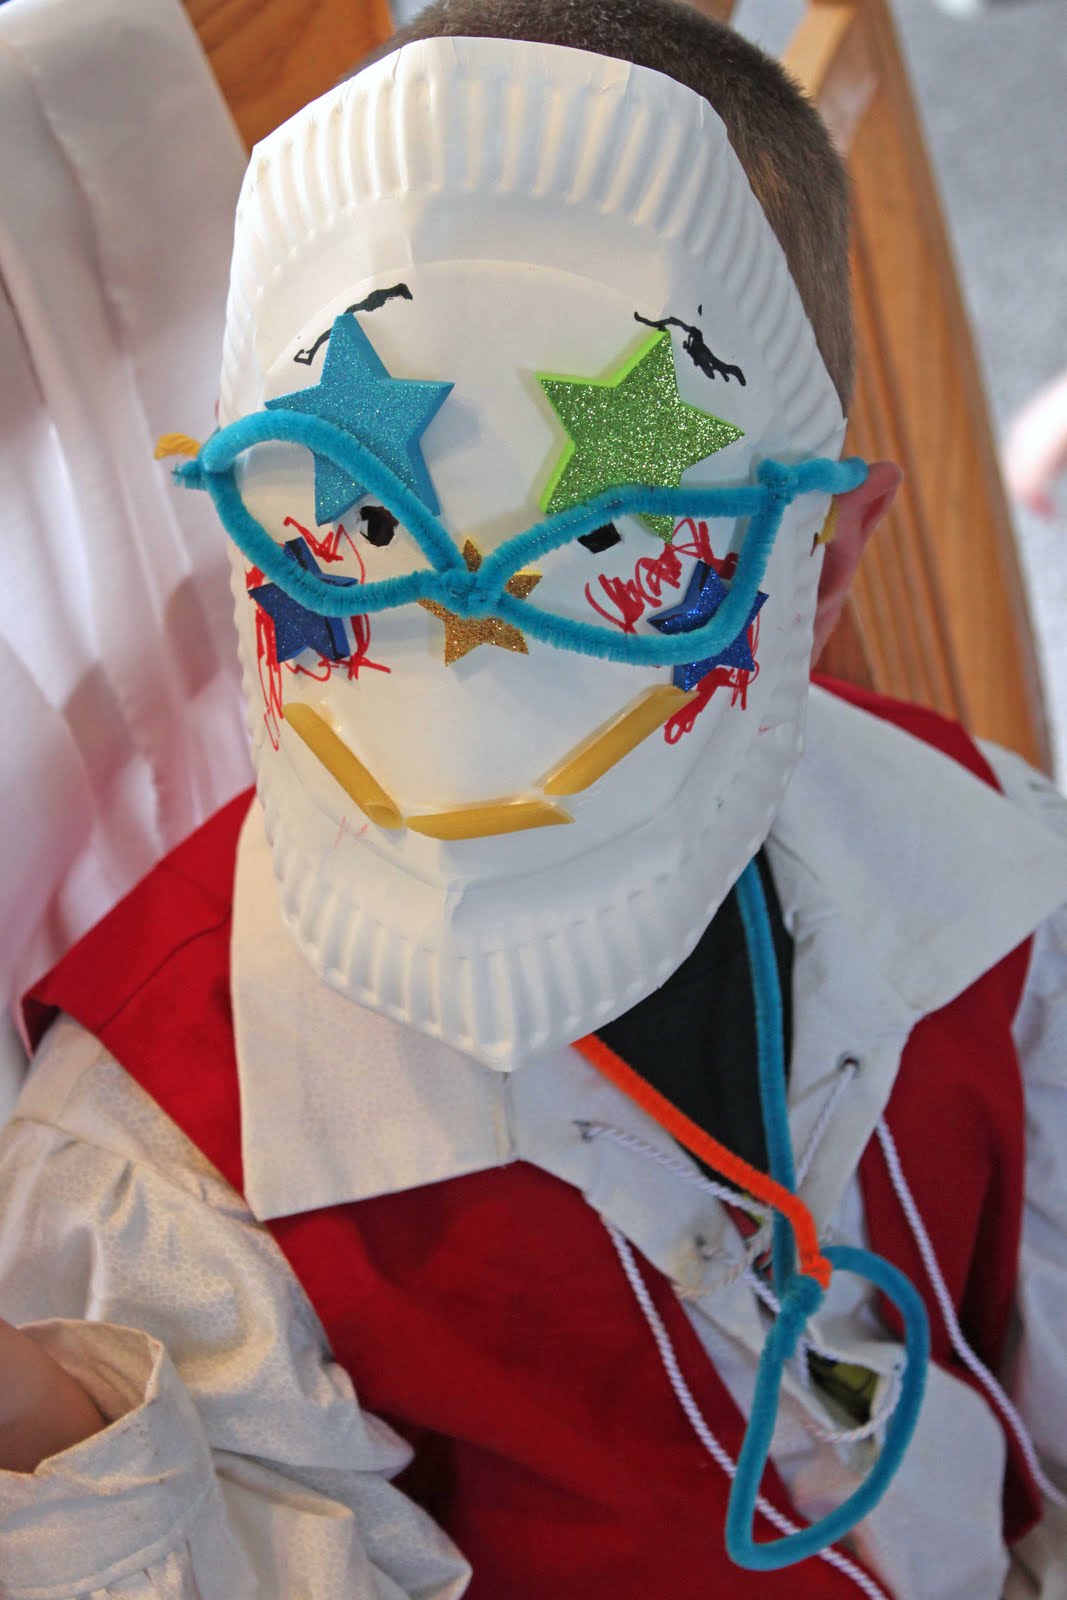
The items on the craft table included a 10" x 90" strip of fabric for each child, paper plates, regular printer paper, card stock paper, neon pipe cleaners, foam star stickers, yarn, ribbon, penne pasta, crayons, colored pencils, markers, glue, tape, hole punch, stapler, and scissors.


Here is what they came up with:  (sorry about the stars over some of their faces, but not all these little sweeties are mine, so you understand.)

A starry-eyed cowboy.
This little guy made a myriad of accessories, including a gun and a map.
A shield and a whip.
This is an owl with wings.
A necklace with "princess wings."
Even my husband got in on the fun with his goofy ears and funky nose.
the birthday boy!!

In my unbiased opinion, I think Xavier's was the best of them all!  Happy Birthday, buddy!

Friday, May 27, 2011

car seat re-cover

This little project was started before Graham was born, but got interrupted by his birth and didn't get finished until yesterday.

The carrier car seat we own had an awful plaid, lumberjack-ish pad with almost no padding.  So, before Graham came, I decided to redo the padding and sun visor in a gender-neutral, but much cuter fabric.  I got the pad done the week before Graham was born, but other things came up, and I didn't finish the sun visor right away.

Then, the weather here in Utah became extremely cold and rainy for the past two months, so it became unnecessary to finish the visor until recently.  And, while the weather here still is not sunny and warm, I refuse to believe that the wet, cold weather can last much longer.

I've gotten off topic, so without further ado, here is the car seat with new "upholstery."

Without a pattern for a car seat pad and visor, I wanted to make sure the new ones would fit, so I tore apart the old ones and used the pieces as a pattern:

Everything seemed to fit perfectly, and I was able to fix a few things about the old pad that I didn't like . . . namely that the top and bottom edge came off a lot because the elastic had been stretched out and wasn't holding the pad on very well.  Also, I used two layers of batting to make Graham's ride a little more comfortable.


Hopefully, I'll have time for more sewing over the weekend.  Have a great one!


Photobucket


My Uncommon Slice of Suburbia


Monday, April 4, 2011

coming home from the hospital - girl

The outfits I made for a little girl were a pattern of my own design.  I used cotton fabric as the bottom layer with drapery sheers for the top two layers to create a light, flowy dress.

I used green because I feel like pink is so overused for little girls.


I liked how they turned out, but I think I may end up doing some embellishing on the yoke because they look a little plain.  (I have time to play with these because I certainly won't be using them for my sweet baby boy!)

Wednesday, February 2, 2011

Valentine's iPod

Look what I made today!!

I'm getting together this afternoon with a group of girls, and we're going to write letters to someone we admire. 

But, I thought to myself, "What is a nice letter without a treat?"

I found a picture on the web of this little cutie, and decided to copy it.  Not my own original idea, but I'm still very excited about it!

If you want to make your own, you'll need boxes of Sweethearts, pink paper (cut to the height of the Sweethearts box,) string (cut to 12",) peanut butter cups, and the iPod images, which I am providing below (plus tape and/or glue.)

Just download the images and print at an 8x10 size on regular paper.  Personal use only, please.

Linked to:

Monday, January 24, 2011

flannel baby blankie

Each of my kids has had several blankets, but the ones they end up attaching to that then become their "blankies," are the flannel, crocheted-edge ones.  I cannot refuse to do the edging because I hate to crochet, but luckily, I have an uber-talented sister who loves me enough to edge blankies for me!--I honestly can't figure out how anyone can enjoy crochet.  It's time-consuming, and by the end of a row, my hand is usually cramped and looking like the claws you find on the ugly old woman version of the queen in snow white.

With the new little one joining us in about two months, it is time to make a few new blankies.  We don't know the gender of this baby (it's most likely our last baby, and we wanted a surprise,) so there is one for a boy, and one for a girl.  I'll give the other one away as a baby shower gift.

I thought it might be fun to give you a step-by-step tutorial for my version of these easy little blankets.

First, you'll need 1 yard each of two coordinating flannel fabrics.  Wash and dry them.


 2.  Next, you'll need to iron each piece.


3.  Lay your two pieces on top of one another, wrong sides together, matching up two edges.  Brush your hands along the fabric, starting at the corner you lined up and working your way out to make the two pieces of flannel "stick" to one another.


4. Now, you want to trim your edges so that they are straight and even.


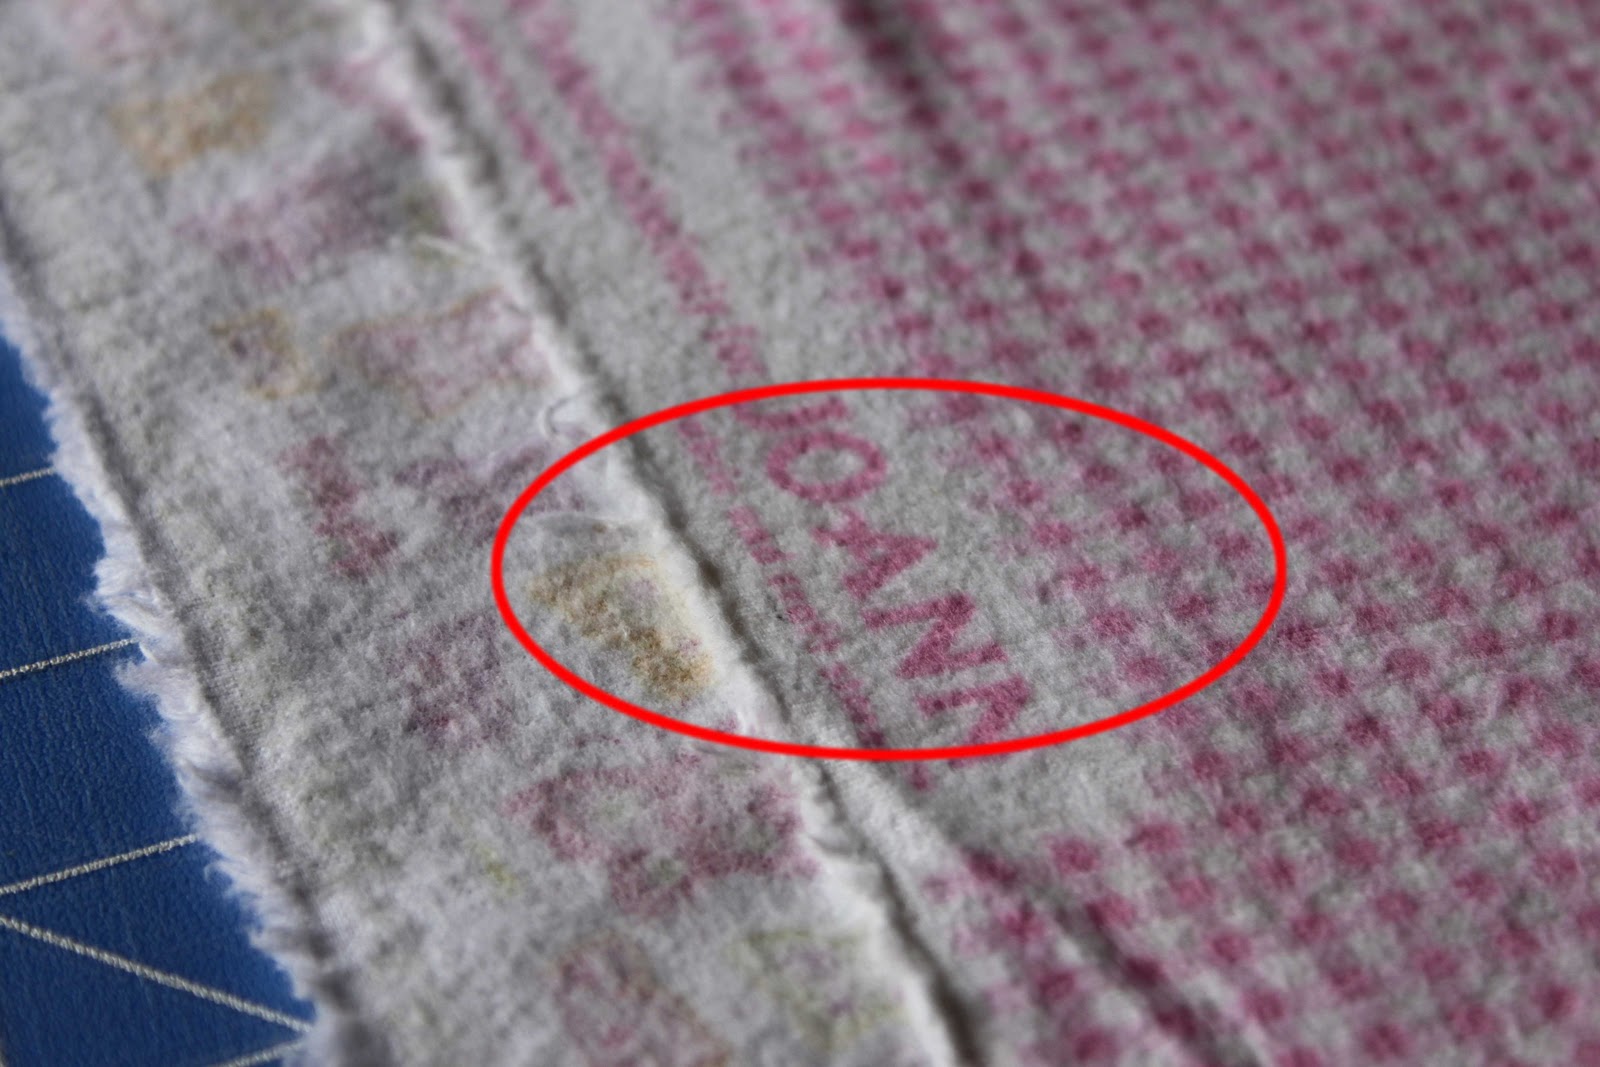
**One of my pet peeves is when stores have this printed on the edge:**
It forces me to cut an extra 1 1/2 inches off because I don't want their name on the edge of my baby's blanket!  (scowl)


When you're finished trimming, you should have 4 edges lined up perfectly.


5.  Next, I pin (about 10 inches apart) my fabrics together.  I do this because it bothers me when they shift after being washed several times and there is an edge with a fold in it because one fabric is slightly bigger than the other.  I like to machine quilt the blanket so that it all stays in place.


You can pin using any method you like.  You could measure to make your lines even.  I counted little squares for these blankets.  You could even free-hand it, if you're so bold, but I strongly recommend pinning before you start so that the pieces don't shift while you're sewing and create bunches and perma-wrinkles in your blanket.

6.  After pinning, sew your layers of flannel together.


7.  Next, I like to serge the edges to keep the flannel from fraying, and to give it a little more sturdy edge.


8.  The final step requires the use of a hemstitch needle.  (Shown below.)
 

Sew around the edge of the blanket, turning the blanket with the needle down at the corners.  I sew 3/8" (the first line) from the edge, but you could sew a closer or further from the edge, depending on how wide you want your crocheted border.
 These are the holes my sister will use to put on the crocheted border.

Viola!  Two blankets done in a matter of a few hours (minus the border.)

Linked to:
All Thingz Related
Show and Tell Green


CreativeShareWednesdays

Get your craft on Thurs.


Catch a Glimpse Button


giveaways
HookingupwithHoH