
Friday, December 31, 2010
Thursday, December 30, 2010
older troublemaker pajamas (new look 6131)


They were quick and easy, which was super beneficial, since I was on a time budget.


Wednesday, December 29, 2010
dress shirt pajamas (simplicity 5343, 5534)

Since patterns tend to run a little big, I took Zoram's measurements, and then measured the pattern pieces and felt confident that the 18 month pieces would fit.
Trying to make a two-piece set for him like his brothers, I used Simplicity 5343 for the pants, but couldn't bring myself to dress my little guy in the empire waisted frilly top (nor would his dad have been very happy with me):

As I began looking around, I decided I didn't have the time (or the brainpower) to make up my own pattern for a top, nor to size down the pattern pieces I was using for my older troublemakers.
And then it dawned on me . . . what is a pajama top, anyway? Nothing but a button-up shirt made out of flannel! Score!! Simplicity 5534 (out of print, but luckily I already had it in my pattern library) had just what I was looking for!

The pajamas ended up fitting just like I wanted them to, although if I could go back, I would probably make the top an inch or two longer.

 |
| (Ignore the new, slightly too big undershirt sticking out of his sleeve. It'll shrink in the wash.) |
Tuesday, December 28, 2010
girly nightgown

That's right, I did it again! I made my own pattern.
To be fair, it was based on Dana's shirt dress. I used the same style puffed sleeve and rounded neck, and then cut the side seams in a straight line, instead of tapering them at her waist. I extended it to the appropriate length for Rora, and then to finish it off, added a giant ruffle around the bottom to make it super-girly.
Rora was hesitant to try it on at first, but when I told her it was like a dress she could wear to bed, she hurriedly put it on, and then asked me, "Do I look like a beautiful princess?!"
I think so . . . don't you?

(I can't say that I've ever seen anybody but a pirate princess wear a skull and crossbones, but she's still a princess nonetheless.)
Linked to:

Monday, December 27, 2010
hanging
So, I kind of left you all hanging after Wednesday!
Hopefully, you (like myself) were all busy enough on your own that you didn't need my Simple Kids' Christmas ideas. To satisfy your curiosity, however, we ended up making foam ornaments with the troublemakers' grandma, baking Santa's sugar cookies, making little treats, and much of our time was spent keeping our house clean to impress Santa (which he was.)
Oh, and sewing . . . lots and lots of sewing, but that all happened while the troublemakers were sleeping or out, since all of them still believe in Santa this year (and sadly, this could be the last year that was so.)
The good news is that now that the gifts have all been opened, I'll be able to post the things I was able to get done for you to see during the coming days.
Hopefully you all had a good Christmas filled with family, love, warmth, and fun, like we did!
Wednesday, December 22, 2010
simple kids - day 3

Writing to Santa is today's simple idea for the kids to do today.
If you want it to take more time, make the older kids write (or sound out) what they want to say, while the younger kids can draw a picture. Get out crayons, markers, stickers, or whatever else you think Santa might enjoy receiving from your kids.
Here is the template I made for my kids using Photoshop. Feel free to download it, place it in a Word document, change your margins to 0", and then print.

Tuesday, December 21, 2010
time crunch

I think from the post about this year's Halloween costumes, you've probably gathered that I'm a procrastinator. Remember all that flannel I bought at the Black Friday sale? Well, it's not made into pajamas, yet. As of this evening, I have them all finally cut out, but none of the assembly has begun.
Also on the list is the prettiest troublemakers' main gift. She's very into dress-ups lately, and she's (hopefully) getting a whole slew of them from Santa.
Lucky for me, I have awesome parents.
My mom called me today and asked if she and my dad could take my 3 oldest troublemakers (the potty trained ones) with them to deliver Christmas pies to their siblings tomorrow.
Doesn't seem that heroic, does it?
Except when you account for the fact that this involves delivering to homes more than one hour north of our house, and roughly half an hour to the south of our house, with many stops in between. I nearly cried when I realized I would be down to one child for several hours, which will help me make a significant dent in what needs to be done during the next 3 nights.
Thank goodness for the little miracles!
simple kids - day 2

Today's idea for a project with the kids is a gingerbread house!

Now, the only way this is a simple, non-messy project is if you buy a kit. Look for one with pre-made frosting, fun pieces, and ours even came with a base that had grooves to put the bottom of the house, the sleigh, and the reindeer in!
Don't forget to "accidentally" leave out a few candies for the smallest trouble-maker!


Monday, December 20, 2010
simple kids - day 1

Okay, so your first simple kids' Christmas idea is one of the basics, and you may have already done it, but you can never have too many, so make some paper snowflakes!

See what kind of fun shapes you can make!
With the younger troublemakers who needed more help, I let them tell me what shape they wanted, and on which side of the triangle they wanted it.
Hang them from the ceiling. Hang them on your windows, the walls, the door, etc. The possibilities are endless!

Happy Crafting!
simple kids' christmas
Are your kids out of school this week?
Mine are.
The. Whole. Week.
So, what am I supposed to do with my kids that will keep my house in tact, yet keep them busy enough not to make me crazy? ("Santa wants our house to be clean," only works so many times.)
I'd like to introduce:

Ihate dislike doing crafts with my kids. I'm too much of a perfectionist. I love the little art projects they bring home to me from school, but watching them make something while accidentally sticking their fingers in the glue, putting pieces on crooked, etc makes my skin crawl.
So, I'm putting that aside this week and working on simple crafts with my kids to keep them entertained for the next 5 days until Christmas.
Each day I'll feature one so that maybe we can all enjoy (survive) this week together!
Mine are.
The. Whole. Week.
So, what am I supposed to do with my kids that will keep my house in tact, yet keep them busy enough not to make me crazy? ("Santa wants our house to be clean," only works so many times.)
I'd like to introduce:

I
So, I'm putting that aside this week and working on simple crafts with my kids to keep them entertained for the next 5 days until Christmas.
Each day I'll feature one so that maybe we can all enjoy (survive) this week together!
Thursday, December 16, 2010
homemade french bread

This recipe comes to you from my gorgeous Guatemalan friend, Luisa, who is a cooking/crafting/do-it-yourself-er extraordinaire, but unfortunately, her blog is also her family blog, and so it's private. So, I hope she won't mind if I share with you her (mother-in-law's) recipe for homemade french bread because I think it's something everyone should have!!
**Read through the whole recipe first before you start. It takes roughly two hours start to finish, so bear that in mind when making this.**
Homemade French Bread: (2 loaves)
2-1/2 cups very warm water
2 Tbsp sugar
2 pkgs or 4 tsp dry yeast
1 Tbsp salt
2 Tbsp cooking oil
6 cups white flour
Sesame or poppy seeds (optional)
1 egg
corn starch
1. In 1 cup warm water (warm enough for a child's bath--not yours! You don't want to scorch your yeast, just make it feel all snugly and warm,) add the yeast and allow it to begin percolating.
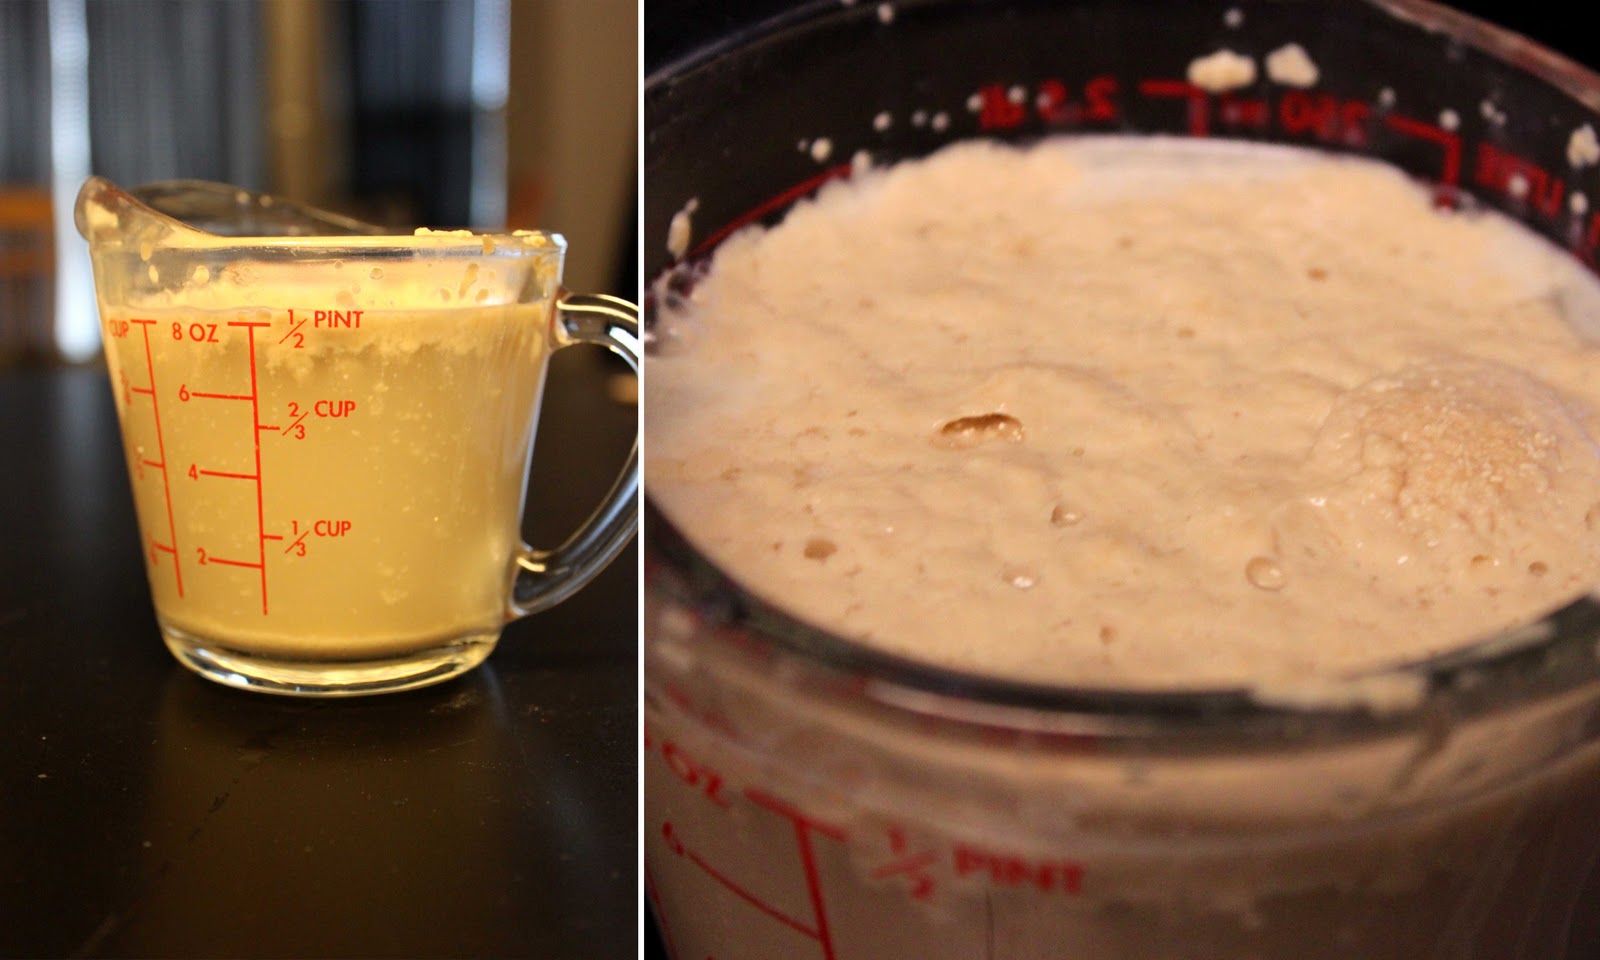
2. Meanwhile, run a large mixing bowl under warm water and then measure out your sugar, salt, oil, and 3 cups of flour into the bowl.

3. Add the yeasty water plus the other 1-1/2 cups warm water and mix.
4. Slowly add the other 3 cups flour, mixing between each cup added. By the end of this step, I usually knead with my hands rather than mixing with a spoon, but whatever you want is fine. (**This recipe works really well at a high altitude, so those of you living in lower altitudes than Utah might want to stop with just 5 to 5-1/2 cups flour total.)

5. Let dough rise for 10 minutes and then stir or knead it back down (even if it doesn't appear to have risen much.) Repeat this step four times.
6. Divide the dough in two parts and place one on a lightly floured surface, leaving the other in the bowl for now.

7. Roll the dough on the counter into a rectangle approximately 9" by 12".

8. Roll up the dough jelly roll style and pinch the ends closed.

9. Place on a baking sheet sprinkled with corn starch.
10. Make the other loaf in the same manner.

11. Allow the dough to rise uncovered for 30 minutes.
12. Using a sharp knife, make 3 shallow diagonal slices in the top of each loaf.

13. Brush the loaves with a slightly beaten whole egg, and then sprinkle with poppy/sesame seeds, if you would like. The heavier you brush on the egg, the crustier the top of your loaf will be.


14. Bake immediately in the oven for 25-30 minutes at 400 degrees.

Enjoy your beautiful, delicious homemade french bread. Thanks, Luisa!!
This ends up being a lot of bread for our family, so we usually have it as a side dish with something like spaghetti or chicken casserole. Then, the next day I usually slice it thinly and make mini-pizzas for the trouble-makers' lunch. It can also be sliced across the middle and made into garlic bread (grocery store style.)


Any other french bread ideas out there? I'd love to hear them!
Tuesday, December 14, 2010
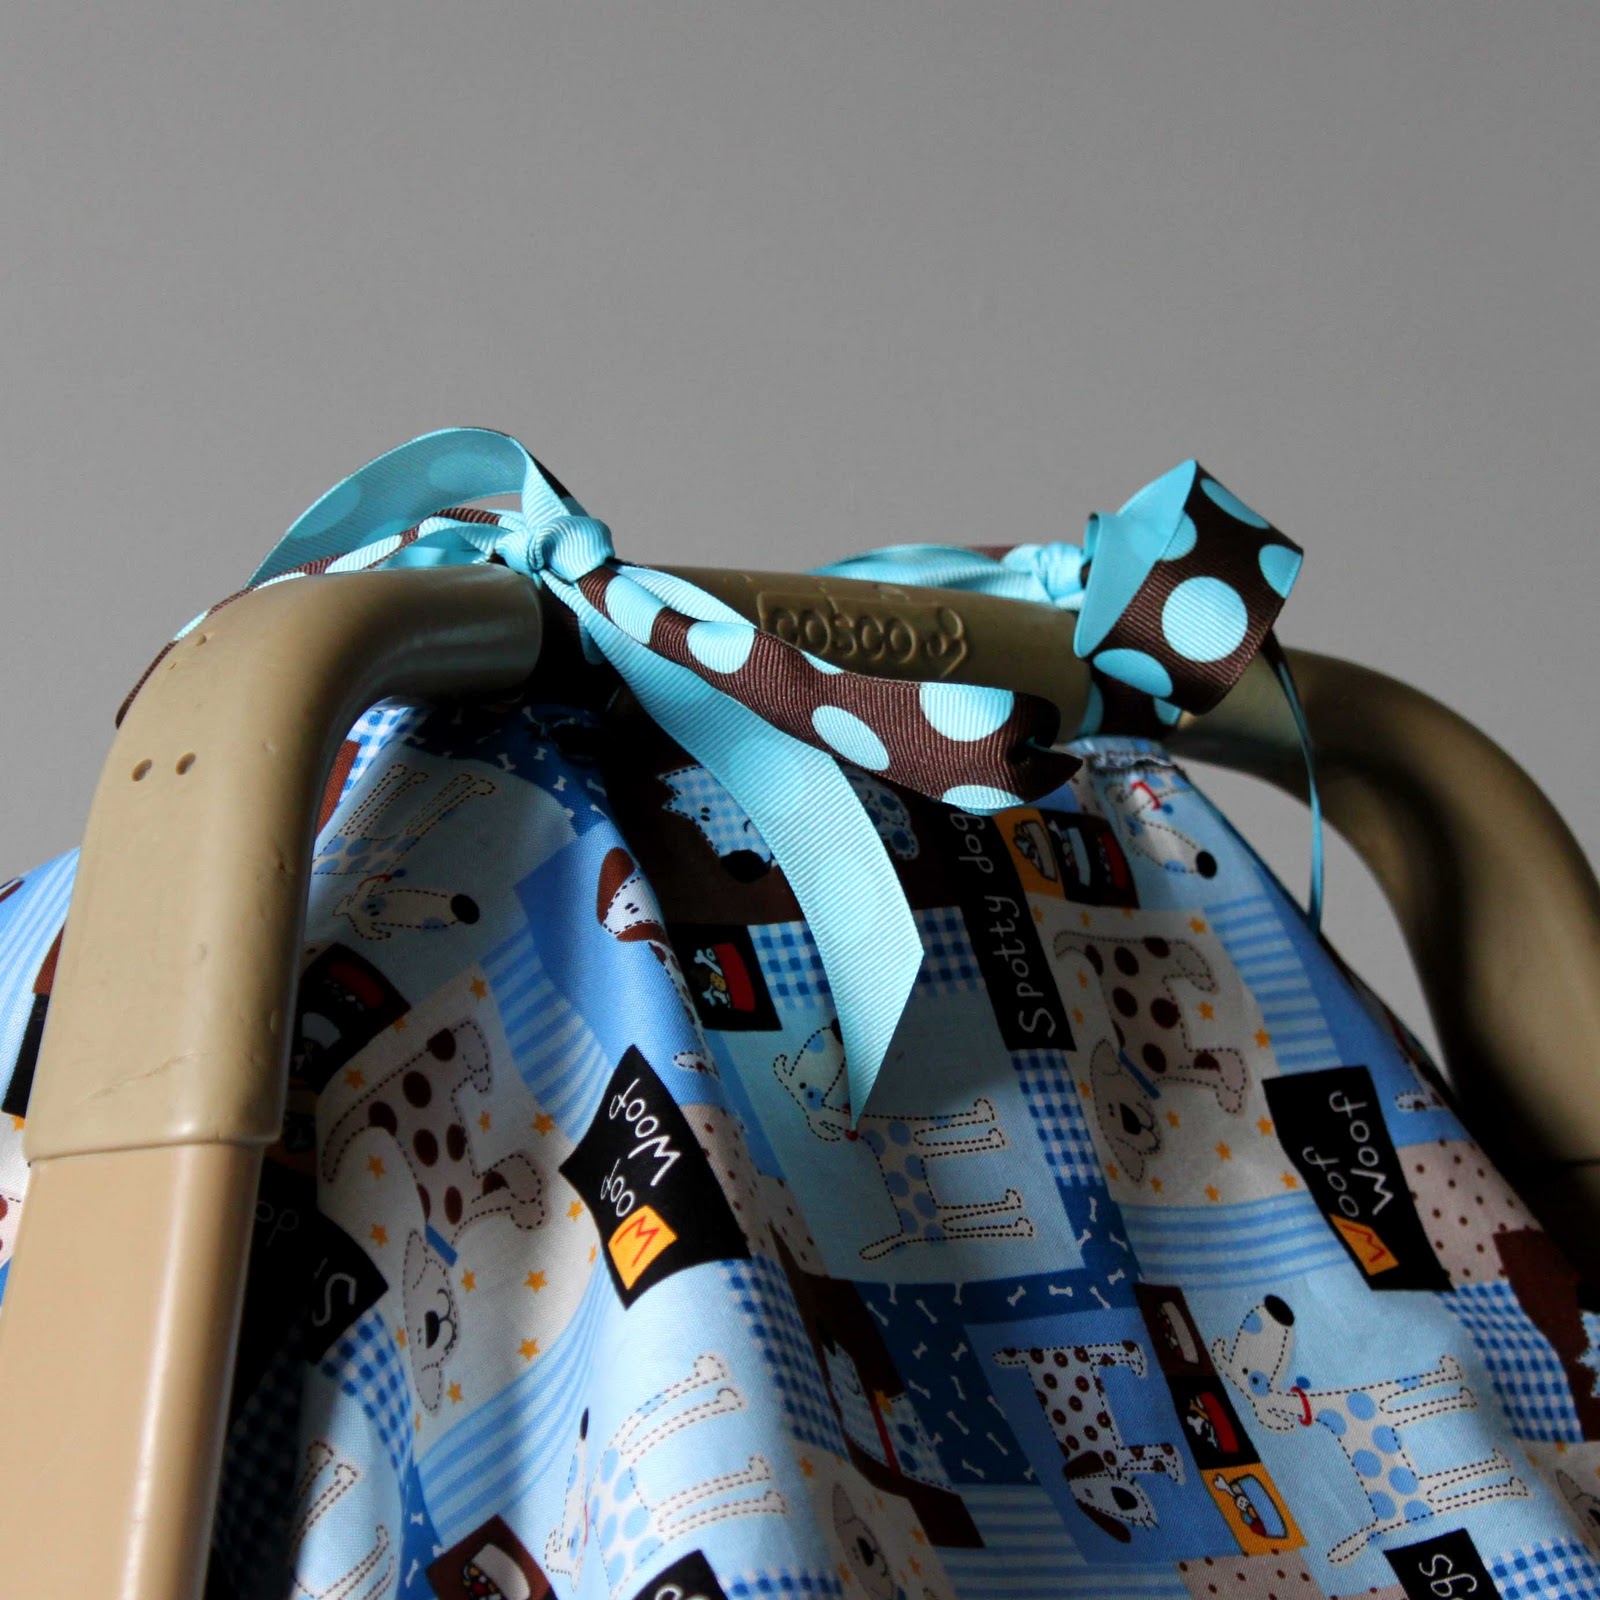
reversible car seat cover
This project is so easy!
This weekend, I found myself three hours before a baby shower, and not having gotten a gift for the new mommy, yet.
So, I ran to the fabric store and got 1 yard each of two complimentary fabrics, and a spool of 1-1/4" ribbon to make a reversible car seat cover.
You've seen these before . . . you know, the canopies that hang over the baby, but still allow you to carry the car seat by the handle? I love them because when curious people want to see your baby, you can pull the curtain back a tiny bit for them to see, but not enough for someone to put their germy hands inside and touch your little bundle's face. They also block out light to help the baby sleep more soundly.


For my version of the car seat cover, I laid the two pieces of fabric on top of each other, right sides together and sewed around the edge, leaving an opening to turn it.

Then, I ironed and top stitched the hem in place, closing the turning hole.
Next, I sewed two straps (approximately 30 inches long each) in place in the center, about 6-7 inches apart from each other.


Finally, on either side of each strap, I sewed a button hole the same length as the ribbon's width to pull the straps through to the other side.


Ta-Da! Total, this project took about an hour, so making several of these would be quick and easy for a go-to baby shower gift.

This weekend, I found myself three hours before a baby shower, and not having gotten a gift for the new mommy, yet.
So, I ran to the fabric store and got 1 yard each of two complimentary fabrics, and a spool of 1-1/4" ribbon to make a reversible car seat cover.
You've seen these before . . . you know, the canopies that hang over the baby, but still allow you to carry the car seat by the handle? I love them because when curious people want to see your baby, you can pull the curtain back a tiny bit for them to see, but not enough for someone to put their germy hands inside and touch your little bundle's face. They also block out light to help the baby sleep more soundly.

For my version of the car seat cover, I laid the two pieces of fabric on top of each other, right sides together and sewed around the edge, leaving an opening to turn it.

Then, I ironed and top stitched the hem in place, closing the turning hole.
Next, I sewed two straps (approximately 30 inches long each) in place in the center, about 6-7 inches apart from each other.


Finally, on either side of each strap, I sewed a button hole the same length as the ribbon's width to pull the straps through to the other side.


Ta-Da! Total, this project took about an hour, so making several of these would be quick and easy for a go-to baby shower gift.

Tuesday, December 7, 2010
christmas scent
Some of my favorite things about this season are the smells! Cinnamon, citrus, pies baking, candies being made . . . oh, darn it! Now I have to clean the drool out of my keyboard!!
I love to have the scent of Christmas in the house even on days when my projects include less fragrant things, like sewing, cleaning, or dejunking in preparation for morejunk crap stuff. So, I like to make up some Christmas Scent and let it fill the house.
There are several variations of this, most of them are close to the same, but here is my version:
Christmas Scent:
1 lemon, sliced
1 orange, sliced
4 cinnamon sticks
4 bay leaves
2 tablespoons whole cloves
4 cups water
First, slice up your lemon:

and orange.

Then, add the bay leaves (they don't have to be organic, but that was the only bottle I could find with whole bay leaves in it.)

What the . . . ? Why would they include a sprinkling strainer on a bottle of whole bay leaves?

Anyway, add your bay leaves:


Now, add 2 tablespoons of whole cloves, once again with a sprinkling strainer that can't possibly do anything but tease you with the smell of what's inside!


Last, pull out 4 sticks of cinnamon:


Finally! A reasonable lid!

Throw all the ingredients into a crock pot:

Add 4 cups of water:

Turn your crock pot on low:

And enjoy the scent that will fill your home!
This same pot of ingredients can be used again and again. You just have to put them in the fridge when they're not being heated to avoid molding (because that's not a good smell!)
As you heat the mixture, the water will evaporate. I like to just throw the lid on to help slow that process:

It'll stifle the smell a little bit, but with four little troublemakers running around, I tend to forget to check the water levels.
When the water level gets low, just add more water and keep enjoying the scent!
Feel free to throw all the dry ingredients in a jar with the directions, and give these away as gifts to teachers, neighbors, and friends.
I love to have the scent of Christmas in the house even on days when my projects include less fragrant things, like sewing, cleaning, or dejunking in preparation for more
There are several variations of this, most of them are close to the same, but here is my version:
Christmas Scent:
1 lemon, sliced
1 orange, sliced
4 cinnamon sticks
4 bay leaves
2 tablespoons whole cloves
4 cups water
First, slice up your lemon:

and orange.

Then, add the bay leaves (they don't have to be organic, but that was the only bottle I could find with whole bay leaves in it.)

What the . . . ? Why would they include a sprinkling strainer on a bottle of whole bay leaves?

Anyway, add your bay leaves:


Now, add 2 tablespoons of whole cloves, once again with a sprinkling strainer that can't possibly do anything but tease you with the smell of what's inside!


Last, pull out 4 sticks of cinnamon:


Finally! A reasonable lid!

Throw all the ingredients into a crock pot:

Add 4 cups of water:

Turn your crock pot on low:

And enjoy the scent that will fill your home!
This same pot of ingredients can be used again and again. You just have to put them in the fridge when they're not being heated to avoid molding (because that's not a good smell!)
As you heat the mixture, the water will evaporate. I like to just throw the lid on to help slow that process:

It'll stifle the smell a little bit, but with four little troublemakers running around, I tend to forget to check the water levels.
When the water level gets low, just add more water and keep enjoying the scent!
Feel free to throw all the dry ingredients in a jar with the directions, and give these away as gifts to teachers, neighbors, and friends.
Subscribe to:
Posts (Atom)