Showing posts with label altered pattern. Show all posts

Wednesday, June 1, 2011

ruffle skirt

I wanted to make a cute skirt for myself, but didn't want to spend a lot of time.  So, I cut out a simple skirt from MADE, but before sewing it together, I did a little embellishing with some ruffles.


4 rows of them to be exact.
For anyone interested in ruffles, mine are 1 inch wide.  I cut them twice as wide as the skirt, and then gathered to the same width as the skirt using a long stitch running down the center of each strip.

I think it's cute, and I might make another one out of something a little lighter weight!


Thursday, March 31, 2011

coming home from the hospital - boy

This is the first baby that we haven't known the gender, and this is also the first baby that I've been bold enough to trust my own two hands to make the little bundle an outfit to come home in . . . or 4.

"Why four?" you ask?

Well, because we didn't know the gender, and each of our babies has gotten bigger than its previous sibling, with our youngest weighing in at 9 lbs 2 ozs (which is why I also opted for my first epidural, people.)  So, I took with me to the hospital two outfits for a boy, and two outfits for a girl (one each in newborn size and 0-3 month size.)


I finished up the boy outfits and was completely in love with them!
 

From the get-go, I wanted to applique a tie onto a white shirt, which I was able to whip out quickly. 


The pants were a little trickier for me to settle on a design I liked.  Finally, I decided to use (Simplicity 5534 - out of print), except that I wanted a flat front.


I wasn't exactly sure how much to take out of the front pieces, so imagine my relief when Dana at Made posted a tutorial for flat front pants during her Celebrate the Boy!!  I still used (Simplicity 5534), but I altered the front pieces the same way Dana altered hers for the flat look.

So, the pants for my baby boy are brown corduroy with a flat front . . .

and an elastic back!

Tuesday, December 28, 2010

girly nightgown


That's right, I did it again!  I made my own pattern. 

To be fair, it was based on Dana's shirt dress.  I used the same style puffed sleeve and rounded neck, and then cut the side seams in a straight line, instead of tapering them at her waist.  I extended it to the appropriate length for Rora, and then to finish it off, added a giant ruffle around the bottom to make it super-girly.

Rora was hesitant to try it on at first, but when I told her it was like a dress she could wear to bed, she hurriedly put it on, and then asked me, "Do I look like a beautiful princess?!"

I think so . . . don't you?

(I can't say that I've ever seen anybody but a pirate princess wear a skull and crossbones, but she's still a princess nonetheless.)

Linked to:

Thursday, October 14, 2010

the tin man costume (simplicity 4133)

Last year, in going along with our Wizard of Oz theme, Samuel was the Tin Man.

I once again used Simplicity #4133 with a few changes.
I didn't make the "heart" on the watch chain, since most of the book/movie, he doesn't have that.  Also, I tacked the uppermost shoulder hinge on each side to the shoulder so they didn't look so droopy.


If I were to do it again, I would lose the foot covers completely, and maybe just spray paint an old or cheap pair of shoes silver, since I already had the paint from spraying the funnel on his head.  The foot covers just flopped around all night long while we were Trick-Or-Treating and ended up getting completely mangled.

Don't forget to check out the other costumes in this series: Toto, the Scarecrow, and Dorothy!

Wednesday, October 13, 2010

scarecrow costume (simplicity 4133)

This costume was actually the second costume I ever made, and it's been worn many times since then.  Last year, the idea for doing the Wizard of Oz theme with my kids all started with this costume.

I used Simplicity #4133 to make the scarecrow costume originally, and when I realized the costume would fit Xavier, and that I still had the pattern, the wheels in my head started to turn about turning my other kids into characters, too.


From what I remember about this pattern, it was a fairly intricate pattern with rafia for the straw, patches on the pants, five different pieces to the costume, etc, but it's the best scarecrow pattern I've seen out there.  Just keep in mind that if you're going to make it, give yourself some time.


I also made one change to the pattern.  I didn't use their pattern patch because I thought square ones of different fabrics would look better, and when I was done appliqueing them on with the sewing machine, I handstitched large sloppy stitches around each patch with some really thick thread for an added detail.

Don't forget to check out the other costumes from this year: Toto, Dorothy, and the Tin Man!

Monday, October 4, 2010

clown costume (mccall's 6142)

During the past 7 Halloweens, I've made a lot of costumes.  For my kids, other peoples' kids, adults, etc. 

I didn't keep pictures of all of them, but I'm going to share the ones I do have pictures of during the month of October.

I have several criteria for making costumes:
1.  It would be nice if it's not form-fitting, so that another child of different proportions could possibly wear it later.
2.  It is preferably gender neutral, but I realize that's not always possible, so that rule is bendable.
3.  I try to do the best job possible so that the costume is good quality and will last for many years.

So, my first costume I ever made was a clown costume for Samuel from McCall's 6142.

It was a very easy pattern, but the first year, I decided to only do the fabric because I don't really like pom poms that much, but couldn't decide what I wanted to do to embellish it.

(Sorry the picture is grainy.  It's old and was taken on a 2.0 MP camera! *gasp*)

Sometime before Xavier wore it, I added over-sized buttons to the front (and discovered the magic of face "paint.")
Isn't he ADORABLE?!
If you're looking for a clown costume, this one is simple and quick - and it comes with adult pattern sizes, too!

Tuesday, August 10, 2010

noodlehead gathered clutch

Anna at Noodlehead has an adorable gathered clutch that I've been wanting to make.  I love all of it . . . except for the part where you take the cute gathers you've created and mash them down and iron them, making them look like they've been sitting in the dryer too long.

I made the clutch, but I took a few liberties.  When it came to the part about ironing the gathers in place, and adding interfacing to the back, I ran a gathering stitch along the top and bottom of my gathered fabric, gathered it, and sewed it onto an additional piece of fabric with the interfacing attached to it.  That way, I could leave my gathers a little more puffy looking, which I love.

(I used leftover fabric from Rora's skirt, and scraps from a new project I just cut out.)


I think it's so adorable, and it has a card holder inside, which is nice so that I don't have to take my entire wallet with me, either. 

I'm curious . . . what do you think about the changes?  Do you like it better with the flat gathers, or the puffy ones?

Thursday, July 15, 2010

crayon roll

About a week ago, my family and I were invited to a birthday party for a little boy who used to live in our area. Normally, we would not have driven the hour and a half for a 4-year-old's party with his extended family, but we happened to be on our way out of town and travelling through there anyway, so we went.

What kind of gift do you get/make for someone like this? You can't show up empty-handed, but don't want to break the bank for an inappropriately expensive gift. Let me introduce you to the crayon roll . . .


Ta-da!!  These things are easy to make, inexpensive, and cute, cute, cute!  It's a compact, soft carrying case for a 16-pack of crayons.  Each crayon has its own little home, and it's easy to keep in a diaper bag or purse.

I found the Crayon Roll tutorial for this at Skip to my Lou.  I made a few changes:  first, I didn't do the ric-rac around the outside; and second, I used elastic chord and a button to close mine, rather than ribbon.


Then, just like everything I find that is quick and easy, I went overboard and made one for each of my children, and a few extras just to have around in case we need a simple, cheap gift again in the future.

Couple this with a notebook, and you have a sweet little gift for the older sibling of a newborn, for a preschool/kindergarten graduation, or for an impromptu birthday invitation.

Saturday, June 5, 2010

a labor of love

This quilt really was a labor of love. It has been about a year since I finished it, but it is still one of the projects of which I am most proud.

It all started when my mom retired from teaching sewing, and upon going through all her old stuff, we found this little gem: The Best of Miniature Quilts Volume 2. Inside it were 18 patterns, with directions, for some of the most beautiful, incredibly detailed quilts I had ever seen. They were all miniature quilts meant to be hung on the wall, but I had other plans. I asked to "borrow" the book, and have never returned it--sorry, Mom!!

The pattern I fell in love with was called Don't Tread on My Heart, and I wanted it for my little girl's twin bed when she moved out of the crib. With finished dimensions of 20 1/2" x 29 1/2", it obviously needed some adjusting for a twin-sized quilt.

I enlarged the pieces to twice the size in the book, and then cut out enough fabric for twice as many hearts as it originally asked for. The original quilt pattern was for only the area inside the red box in this picture:
As you can see, I added quite a bit. The whole quilt ended up being over 740 pieces!


I also created my own design element that got a lot of funny looks. I can't even count the number of times I heard, "Why are the corners cut out?"

Although it might look ridiculous laying out flat, the corners being cut out made it so that the quilt could be laid on a day bed, or a bunk bed without bunching on the frame, like so:


For the first time in my life, I hand quilted a quilt, and even though it took several months with my young children laying under the quilting frames, I think it was well worth it. Someday, I hope to be able to provide each of my children with at least one hand quilted piece quilt.


Saturday, May 29, 2010

a (very) full skirt (mccall's 5631)

Since the rule is that you can't wear white until after Memorial Day, I thought it appropriate to make myself a white skirt, and post about it on Memorial weekend. I wanted something full and fun, so I chose McCall's 5631.


I chose this view (maybe because I wanted white, and maybe because I liked the hem line on it, but it was this view nonetheless:)


I used a white on white calico print from JoAnn's for my fabric. Since it was white, I decided to add a lining, which the pattern does not call for . . . after all, I want what is under the skirt to be left to the imagination! I also added four inches to the length, but that is because of my freakishly long legs. (Finished length on the pattern is 23".)

The sewing itself was not that difficult, but more time consuming than it originally appeared. The pattern asks you to pleat the main fabric, and then gather it to fit the waistband. Can you just hear the skirt getting fuller and fuller by the second?


And this is the final product. Fuller than the picture on the front of the pattern, but still more or less what I expected. I like it, but I'm not as in love as I wanted to be.


I do, however want to try it again in a darker fabric so that I don't feel the need to line it, and see what that does to the volume.

Now I have a conundrum that maybe someone out there can help me solve:


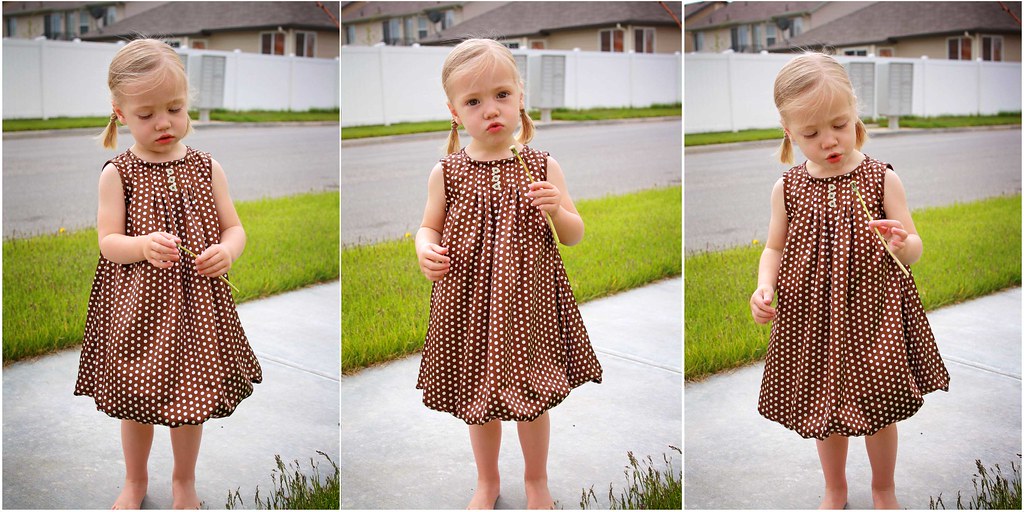
To this point, I have never owned a white skirt. There are four very good reasons for that, and they are ages 6, 5, 2, and 8 months! It seems that any time I try to wear anything white, my freshly bathed children appear before me looking like this, wanting hugs and kisses and wiping their faces all over my clothing:


I have seen other mothers wearing white, and I have to ask myself whether their children just never get dirty, or white is more forgiving than I'm giving it credit? Any thoughts?

Wednesday, May 26, 2010

bubble dress (butterick 4176)

Sometimes when I sew, I need an ego boost, so I like to finish a project in just a few hours. That's what this pattern was for me when I bought it.

Just before making it, Sarah and I were talking one day, and she said, "I saw (insert cute friend's name here)'s girls wearing the cutest bubble dresses at church on Sunday!" The wheels in my head started turning, and I decided to make this dress with a bubble hem:


I wanted to make this view without the sleeves, so I cut out a lining in my daughter's size (size 2.)


Next, I cut out my main fabric, which was a silky print from JoAnn's, from this view, except I cut the hem line all the way to a size 5, and widened the skirt area by about 20 inches.


After sewing the side seams together, I ran a gathering stitch around the hemline of my main fabric and sewed it to the lining right sides together, gathering the main fabric to fit.


I then made the rest of the dress as the directions said.


Just like any dress for a little girl, the most important quality is that it makes her feel like a million bucks, which this does for Rora!


I love the three-button detail on the front:


I also like the simple one-button back closure:


And the final perk to this little dress is that I can add a cute colored ribbon around her waist or an adorable sweater to change up the look a little bit.

This pattern gets two thumbs WAY up!

Sunday, May 16, 2010

attractively bunchy (mccall's 6034)

My friend, Sarah of Sew Saucy turned me onto leggings last year, and I have fallen hard for them. For the Disneyland trip, I wanted to look cute, so I decided to attempt sewing something for myself again. I picked out this pattern, but decided it needed a few alterations, so here's what I did:


I wanted the main body for view A:


except with the collar/sleeve line from view B:


with the band on the bottom of view C (I have a thing about having my bum covered while wearing leggings:)


I've got to be honest. The alterations were not easy, and I don't even know how I would go about a tutorial for them, or even duplicating them, but I love the end result!


**One word of warning for view A . . . there are pleats in the back which tend to accentuate a girl's rear end. I wasn't that worried about it since I have kind of a flat rear end, but it would definitely be something to be aware of should you decide to make that top.**

Saturday, April 3, 2010

shapelessly cute (simplicity 3790)


I thought this shirt was so cute, and it looked like something that would be super comfy in a stretch knit fabric, so I was excited to make it.

Unfortunately, I have this problem making clothing for myself . . . I never look as good in it as I think I'm going to, and it ends up being discarded. Well, this time I'm happy to say that I ended up liking this shirt, and I've worn it a few times since I finished it, but that wasn't without some opposition. The story is fairly entertaining, so if you scroll down past the picture, I've related it there!


I made one major alteration to the pattern. This pattern calls for you to make the insert and attach it to the shirt, but I wanted the freedom of being able to wear several different colors/styles of shirt underneath, so I opted to simply not make that part. Without that piece, this shirt was 5 pieces, and a breeze to make!

Enjoy!


(Admittedly, I need a new belt, so please don't hold that "design flaw" against Simplicity.)

After I finished making this shirt, I took it into the bathroom to try it on. I couldn't decide whether or not I like it, and my husband wasn't around to ask what he thought, so I decided to ask my kids, who are 6, 4, and 2 years old.
"What do you think?" I asked.

Without even looking up from his toys, or turning to face me, Samuel (6) said, "Looks good."

Rora (2) and Xavier (4) then followed his lead (despite the fact that he still had not looked at me,) "Yeah, looks good!" they said.

"You didn't even look at me!" I accused.

Samuel then turned and looked at me, "Oh." (Long pause,) "Is it for Dad?"

"No," I said defensively, "it's not."

"Is it done?" he asked.

I guess men learn these honest, yet tactless responses early!!